| Home | History | Flying Vashon Rockets | My Fleet | Scans | Links |  |
Flying Vashon Rockets This page covers various aspects of how to fly Vashon rockets in the 21st century. On this page: | Propellant | RockSim | Refurbishing | Tips | Propellant The first consideration is propellant, because RP-100 (R-12 Freon) is no longer available (and you wouldn't want to use R-12 anyway due to its detrimental effect on the ozone layer). Possible propellants include various refrigerants and airbrush propellants. RP-100 was Vashon's trade name for R-12 Freon (Dichlorodifluoromethane). This chlorofluorocarbon (CFC) molecule consists of one carbon atom bonded to two chlorine and two fluorine atoms. It is a wonderfully stable compound that is nonflammable, non-toxic, and has great thermodynamic properties for use as a refrigerant and as a propellant in spray cans. At room temperature and standard atmospheric pressure, R-12 is a gas; but under pressure, it is a liquid. Releasing the pressure on the liquid R-12 allows it to expand rapidly into its gaseous state, which is why it makes a great propellant. The problem with R-12 is that the stability of the molecule allows it to survive being transported into the upper atmosphere before chemical decomposition releases its chlorine into the stratosphere where it can wreak havoc on the ozone there. |
 |
Replacement refrigerants, such as R-134a (tetrafluoroethane — two carbons, four fluorines, and two hydrogens) can be used as a propellant in Vashon motors. It is non-flammable and it is ozone-safe because it contains no chlorine, but it is a "greenhouse gas" because it blocks infrared radiation. There is also a complication that laws prohibit the deliberate release of this gas into the atmosphere from refrigeration equipment (although it is apparently used as a propellant in some Airsoft guns). Some newer R-12 replacement refrigerants, such as Red Tek and Duracool, which describe themselves as "organic hydrocarbon refrigerants," are blends of propane and butane. These would work as propellants, but they are highly flammable, so their use in Vashon motors is NOT recommended.
Airbrush propellants are readily available and will work as propellant for Vashon motors. These come in cans with the same threaded top that was on the RP-100 cans, so the Vashon fueling valve and hose will work. Some brands of airbrush propellant (such as the current formulation from Testors) consist of isobutane and propane, and are highly flammable, so these are NOT recommended for use as a propellant in Vashon motors. Other brands (such as Paasche) contain only difluoroethane, which is the propellant I have used in Vashon motors. But be sure to check the label of the can to see what it contains! I have seen some cans of Badger Propel that contain only difluoroethane, but some other cans of Propel apparently contain a mixture of difluoroethane and butane.
Difluoroethane (also known as R-152a, Freon R-152a, and 1,1-Difluoroethane) is a molecule consisting of two carbon atoms, two fluorine atoms, and four hydrogen atoms. It is found in products such as Paasche airbrush propellant and Dust-Off "canned air." The cans of Paasche airbrush propellant specifically state that this material is NOT defined as flammable by the Consumer Products Safety Commission (regulation 16 CFR 1500.3). But, the material safety data sheets (MSDS) for difluoroethane list it as a flammable gas. It can catch fire under certain circumstances (such as spraying it at an open flame) so you would need to avoid any situation involving open flames or sparks when using this material. I would also avoid releasing substantial quantities of the gas indoors, since the gas can be explosive when mixed with air in the right percentages. If R-152a does burn, it can produce hydrofluoric acid as a combustion product. R152a itself is non-toxic, but like R-12 it could cause asphyxiation in large quantities by displacing oxygen.
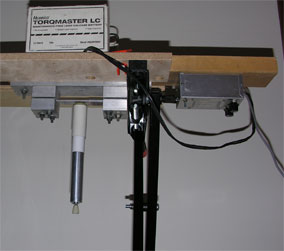
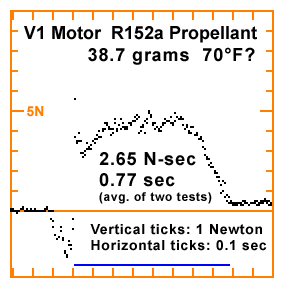
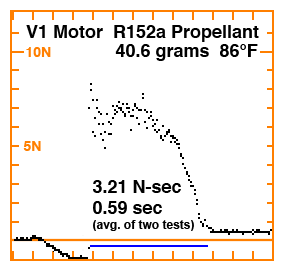
How effective are the alternatives to RP-100 when used in a Vashon motor? Matthew Schmitt did a science project using a thrust stand to measure the results of fueling a Vashon V-1 motor with RP-100, R-134a refrigerant, and R-152a airbrush propellant. Compared to RP-100, Matthew found that R-134a provided 90% as much total impulse, while R-152a provided 76% as much total impulse. Matthew fired his motors horizontally, however, so the thrust times were much longer than a normal Vashon motor firing. Vashon motors are designed to be fired vertically, with the propellant always in the bottom of the tank where the liquid can be forced out the nozzle. Firing them horizontally produces a initial high thrust burst, but then the thrust curve tails off irregularly as gaseous propellant is expelled mixed with the liquid.
A flight test with my Vargúlf model at 87.8°F gave me a total impulse for the V-2 motor fueled with R-152a propellant of 8.4 Newton-seconds, which is pretty close the the thrust stand values. The flight test was conducted at a launch site elevation of 5,800 feet, while the thrust stand tests were conducted at an elevation of 6,300 feet.
Anomaly: The thrust stand data for the V-2 motor shows a thrust duration of around 1.25 seconds, but flight data from my Video Valkyrie appears to show the actual thrust time of the V-2 is only about 0.83 to 0.85 seconds (videos taken from the ground of Valkyrie rockets in flight also seem to indicate this shorter thrust duration). Why the considerable difference? Could it be that the g forces acting on the motor during a flight result in a faster propellant flow rate? Or is something else going on? Perhaps it's just because the tailoff part of the thrust curve doesn't make a noticeable trail or noise? But, it may not be possible to get an accurate measurement of a Vashon motor's performance except in flight.
My RockSim simulations, using my more recent (hot day) thrust stand test results for the motor performance, show that a Valkyrie-1 fueled with R-152a should go about 316 feet, which is about 69% as high as one fueled with RP-100 should go (given Estes's total impulse values). With my cold day total impulse values, the Valkyrie-1 would only make it to 208 feet. If you prefer to believe Matthew's total impulse results (he did do a direct comparison with RP-100 in his tests, after all), then a Valkyrie-1 with R-152a should go about 75% as high as one fueled with RP-100. My flight tests of the Valkyrie-1 on R-152a look similar to what I would expect a rocket of that size and mass to do on an Estes A8 motor.
If we believe my hot day thrust stand data for the V-2 motor, a Valkyrie-2 fueled with R-152a should make it to 786 feet, outperforming a Valkyrie-2 fueled with RP-100 by over 125 feet. This is because the total impulse value I got for the V-2 using R-152a was essentially the same as Estes listed for the V-2 using RP-100m, but due to the lower density of the airbrush propellant the Valkyrie-2 fueled with R-152a weighs 32 grams less. Indeed, I have been very impressed with the flight performances of my V-2/R-152a-powered models (especially since I was expecting much poorer results based on my early V-1 thrust stand data).
Note that the cans of Vashon and Estes RP-100 included an internal hose so that they dispensed the liquid propellant with the can in the upright position. Cans of airbrush propellant do not have this internal hose (they are meant to dispense gas) so you have to invert the can while fueling in order to dispense the liquid propellant into the motor.
Remember that any of these liquefied gasses can cause frostbite if you get them on exposed skin. I blasted myself pretty seriously on the foot (right through my sock) while fiddling around one day; the red patch from the minor frostbite took many weeks to heal. I wear a rubber-coated cloth glove to protect my hand from the exhaust blast during launching, and I would highly recommend wearing goggles while fueling the motor if you do not wear glasses.
If you would like to see my RockSim 8 models for Vashon Valkyrie 1 and 2 rockets, you can download this file. The zip file contains two rocket design files (Vashon Valkyrie 1.rkt and Vashon Valkyrie 2.rkt) and the engine data file (Vashon.rse) that you will need to install into your copy of RockSim. The rocket designs use body tubes and mass points to simulate the V-1 or V-2 motor casings, and the data in the motor file is essentially just the propellant load. I included both R-12 (RP-100) and R-152a (airbrush propellant) versions of the "motors" in V-1, V-2, and V-1/2 sizes. The R-152a total impulse and propellant mass values are from my test stand results.
Many of the used Vashon parts that I have purchased on eBay were not flight-ready, and required some refurbishment to get them ready to fly. The most common problem I encountered was motors or separator units with pressure leaks. During manufacture, when the nozzle stems and threaded connectors were installed into the pressure bells (which were later placed in the bottom and top of the motors, and into the bottom of the separators), an epoxy material was applied in addition to the crimping that held the parts together. This epoxy served to make the joint gas-tight. This epoxy can break loose in a Vashon motor or separator that has experienced a hard impact or has had excessive torque applied when screwed together, resulting in loss of the gas-tight seal. If you find that the nozzle stem on the motor can be twisted, or if the separator can continue to be twisted or wiggled once threaded in place, the epoxy seal has been broken. (This is why you must never apply excessive torque when screwing a separator onto a Vashon motor!)
I have had success in repairing a loose nozzle stem by using thin CA adhesive to penetrate the joint, and then applying a bead of epoxy or thick CA around the stem/bell joint. This is much harder to do with the threaded connector inserts at the top of the tank and bottom of the separator, since only a small amount of thread is exposed (and you must keep glue out of the threads). I've also squirted a smal amount of thin CA into the tank when it is held with the defective joint down, allowing the CA to seep into the joint from the inner side (the thin, flexible CA applicator tubing is useful for this procedure).
In an extreme case when I just couldn't fix the joint with CA as explained above, I used a more extreme method. I threaded the coupler ring onto the leaky threaded connector, and then gripped the ring with pliers and then wiggled and pulled until the threaded connector insert came out (the crimping of the threaded insert and the hole in the pressure bell deformed enough to allow the parts to separate). Then, I used JB Weld to reconnect the parts, working the epoxy around the inside of the hole in the bell and around the crimping of the threaded insert. I was careful to hold the assembly straight while the epoxy cured. Vaseline applied to the threads of the insert and coupler (and to the separator that I was using to align everything) kept epoxy out of the threads. This joint is now held together by the strength of the epoxy "rivet" (no longer by the mechanical connection of the metal crimping) so I treat it as if it could "pop" under pressure at any time — but it seems to be holding very well. I saw a motor for sale on eBay where a different repair had been done to fix a leak in the top threaded connector of the motor: the person had epoxied the coupler ring permanently onto the motor's threads, and then filled in the area around the coupler ring completely with epoxy. This is fine, but it does make the coupler ring a permanent part of the motor.
In case you are curious, the threads on the tank/separator connectors are 5/16-24 size. I wanted to know so that I could get a proper sized nut to use when wiggling the connectors out (rather than mar the coupler ring with my pliers). Also, I ground down on of these nuts to the height of a coupler ring so that it could replace a coupler (when I needed an extra couple ring).
The other problem I have run across with Vashon motors (especially older ones) is that the rubber filler valve may leak propellant after the fueling hose is pulled out. In some cases this leak is minor and doesn't cause a problem as long as you launch the rocket very soon after pulling out the fueling hose. But in a couple cases, either the leak rate was too large, or the small leak rate was unacceptable (when prepping multiple motors in a clustered or staged model, for example). I found that simply inserting a small plug into the filler valve after pulling out the filler hose solves this problem. I made plugs out of brass tubing (a piece 1/2 inch long with the same diameter as a filler hose, plus a piece 1/4 long that slides over the inner brass tube to act as a stop; the pieces are glued together and the tube is plugged with glue), but I've also made valve plugs out of pieces of wooden dowel coated with thin CA to increase its diameter a little. The plug is left in place during flight.
For a motor with a more extreme leak from the filler valve, I made a nozzle filler/firing assembly out of brass tubing that allows the motor to be fueled through the nozzle (while the regular filler valve is left permanently plugged).
Note: The little o-ring that is on Vashon's firing mechanisms has an outside diameter of 9/64 inch, an inside diameter of 3/64 inch, and a thickness of 3/64 inch (these figures apply to the unstretched ring); I couldn't find o-rings that small in a store, but I was able order them online.
One of my motors had a filler valve that was leaking very badly from AROUND the circumference of the filler valve (not through the valve after the filler hose was pulled out). When constructed, the rubber filler valve assembly is glued in place to the inside wall of the motor, and a metal bracing clip is installed to keep it in place. But the glue that held this valve in place had gone bad and no longer provided a gas-tight seal. I was able to fix this by working rubber-toughened CA (Bob Smith IC-2000 brand) around the circumference of the valve and then filling in the rest of the "dimple" in the tank around the filler valve with the CA. The valve now works fine and doesn't leak.
I have never run across a a leak around the circumference of the pressure bells (epoxy was also used to make the pressure bell/motor casing joint gas-tight during assembly of the motors by Vashon).
The pressure relief valve on one of my V-2 motors is finicky, but I'm not sure what's wrong with the mechanism. It is not as easy as it should be to vent pressure using the safety pin, but I can get it to vent by wiggling the pin at odd angles. The pressure relief valves on all of my other motors work fine.
Some of the motors I bought had old contact cement residue on them where fin rails or launch guides were previously attached. I found that brisk rubbing with a cloth soaked in paint thinner works well to remove this residue. And, for making the motor pretty and shiny as new, Mothers® Mag and Aluminum Polish works great.
Part of the reason I had little success with my first Valkyrie in 1972 was my failure to heed the tips about temperature and fueling that Vashon included with the kit. I recommend reading them carefully.
I've had problems with several of the original "NO-KLOG" filler valves that I've purchased on eBay. The material used to make these filler valves is pretty low quality stuff, and repeated use can result in stripping the threads. Be careful when screwing it on and don't use excessive force. I recommend keeping the valve on the propellant can (don't remove it after each use). Also, be sure that the small rubber washer is in place in the bottom of the filler valve before screwing it onto the can of propellant. If the washer isn't there, the propellant will leak out around the threads. Because the washer falls out of the valve easily (and can then be lost), I always stick the end of the filler hose onto the little pin in the bottom of the valve when the assembly isn't on the can of propellant (that way, if the washer falls out, it is on the hose). Also, to prevent leaks from around the hose where it enters the valve, I use thick CA (Bob Smith rubberized IC-2000 CA works great for this) to glue the hose into the valve.
In an extreme case where all I had was a very stripped valve, I use a small amount of epoxy to glue the valve onto the can of propellant (I very lightly greased the threads on the can with Vaseline beforehand). After the can of propellant was exhausted, I used pliers to twist the valve off of the can (grip the barrel of the valve while twisting, not the top of the valve, which can break).
As a final note, someone asked me if Vashon rockets are still legal to fly. It is my opinion that these rockets are not "model rockets" (in the sense of our solid-propellant model rockets) any more than CO2-pressurized or air-pressurized water rockets are. But I would follow the old NAR Cold Propellant Model Rocket Safety Code in all aspects except for using the propellant recommended by the manufacturer (nobody wants you to vent R-12 Freon into the atmosphere).


