| Back to Flying Vashon Rockets |  |
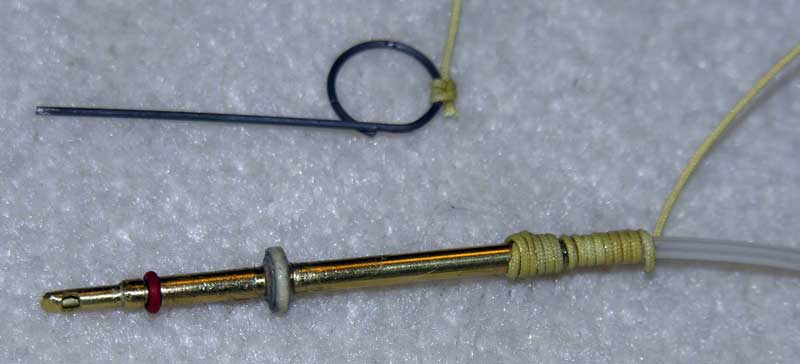
Nozzle Filler/Firing Assembly Some of the old Vashon motors I purchased on eBay had faulty filler valves that would not seal properly and would vent propellant rapidly after the fueling valve was pulled out. To solve this problem, I simply plugged the faulty filler valve (with a plug made of brass tubing or wooden dowel), and I used the filler assembly shown below to fuel the motor through the nozzle.
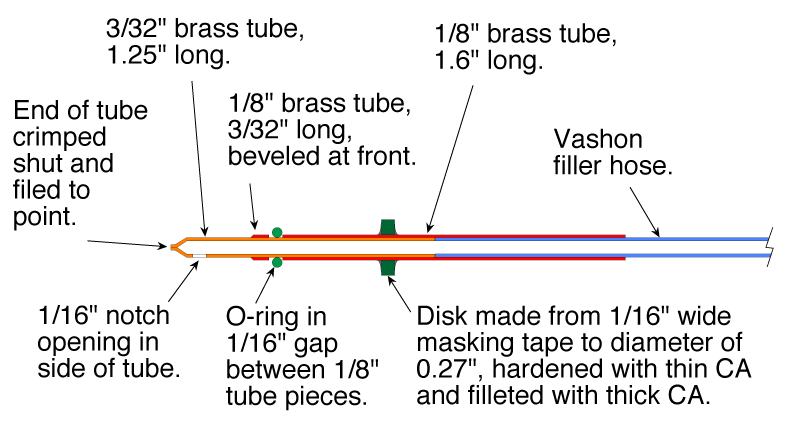
The Nozzle Filler/Firing Assembly replaces the normal Manual Firing Assembly. The outer brass tubing is 1/8" diameter. The vashon filler tube is glued into one end of this brass tube with thick CA adhesive. The inner brass tubing is 3/32" diameter, and it is also glued into the outer brass tube using thick CA. The front of the 3/32" tube is crimped closed and filed to a blunt point, and an opening is notched into the side of the tube. This was done so that the propellant stream does not shoot straight up the center of the motor (I was worried what might happen if the high-pressure stream hit the paper delay disks—possibly it wouldn't hurt at all, but I wasn't sure). A short length of 1/8" diameter brass tube is glued to the outside of the 3/32" tube to make a 1/16" wide gap in which the O-ring sits. The front of this piece of tubing is beveled to allow the tiny O-ring to be slid in place from the front. The little O-ring has an outside diameter of 9/64", an inside diameter of 3/64", and a thickness of 3/64" (these are its unstretched dimensions). I couldn't find O-rings that small in a store, but I was able order them online. The disk that holds the assembly in place was made by wrapping a 1/16"-wide strip of masking tape around the outer tube until it had a diameter of 0.27". The disk was hardened with thin CA, then filleted with thick CA. It was necessary to do some shaping with sandpaper until the firing pin would fit through the nozzle and hold the filler assembly in place. I attached the firing pin to the assembly with 100# Kevlar line, which I wrapped around the brass tube/plastic filler tube joint and CA'd in place to give the joint extra strength. Using this firing assembly is different from a normal Vashon launch in that you leave the propellant can attached when firing the rocket. Be sure to check that you have a handy place to set the can (placement will be limited by the length of the filler hose) so that you can have both hands free to pull the firing pin.
Additional notes: Subsequent testing of the assembly showed that the depth of the gap for the O-ring was not perfect (the assemble fit too tightly into some of my motors, and the pressure in the motor could sometimes force the O-ring down over the 1/8" tube until it reached the disk—although it still sealed the nozzle). To fix this, I used a small file to reduce the diameter of the 3/32" inner brass tube in the gap a little until the fit inside the nozzle was no longer too tight. I also wrapped a couple layers of 1/16" wide masking tape, hardened with thin CA, around the top end of the 1/8" diameter outer brass tube right behind the O-ring's gap—this prevents the O-ring from being pushed out of its groove by the propellant pressure. |

